tl;dr – Writing custom JMeter plugins doesn’t have to be complicated. This tutorial describes the process of developing a custom Sampler and Config Element. We develop a Kafka Producer Sampler and example Synthetic Load Generator Config Element. If you just want to send messages from JMeter to Kafka or see an example of generating synthetic traffic, you can go straight to the source.
So you want to load test a non-HTTP system. At first, you don’t think your favorite load testing tool, JMeter, will be of any help. But you remember that its open source and supposedly extensible. Let’s see if we can do this.
For my use case, I wanted a simple way to load test a system which reads its requests from Kafka. This has two requirements:
- read or generate synthetic requests (messages)
- publish the messages to a Kafka topic
For step 1, if I wanted to pre-generate all the requests, I could use the CSV Data Set Config to read them into JMeter. However, this would require generating a sufficiently-large request set for each test scenario. I preferred to let JMeter generate the actual request from a simple configuration describing the traffic distribution. This configuration could also be generated from real data to effectively simulate the shape of the data coming into the system. Thus, step 1 required development of a new “Config Element” in JMeter.
For step 2, there was no existing option for sending data to Kafka. But now you have one, so just use the Kafka Producer Sampler from kafkameter.
Let’s dig in.
The first challenge is learning the JMeter lingo.
JMeter uses the term Sampler for the component that interacts with the system under test. A Config Element is used to setup variables for use by Samplers, such as the CSV Data Set and Counter. A package of inter-related components (samplers, config elements, visualizers, etc.) specific to one system under test is called a protocol. JMeter ships with HTTP, FTP, MongoDB, TCP, and other protocols. The component reference provides a good guide to the lingo.
For such a widely-used, mature open source project, there’s not a lot of real examples of JMeter extensions. There appear to be two semi-official resources:
- Extending JMeter provides an overview of high-level interfaces and hints at some abstract classes but doesn’t provide detailed guidance.
- How to Write a Plugin for JMeter (PDF) is much more in-depth and includes a lot of example code; however, it focuses largely on graphical components such as custom graphs and visualizers.**
Neither of these resources covered the full array options available to developers. I’m going to attempt to fill this gap here.
If you want to extend JMeter, there are two basic approaches. For writing a Custom Sampler, there’s a few more options.
- Follow the TestElement contract to create a custom JMeter GUI extension in Swing.
- Follow the TestBean contract to let JMeter create the GUI for you.
- For Custom Samplers: Build atop the Java, BeanShell, or JUnit Samplers.
I’m a lazy developer. I didn’t need a fancy GUI for this and didn’t want to build one, so Option 1 was immediately out. That left Option 2 for the Config Element and either Option 2 or Option 3 for the Sampler.
Did I mention I’m lazy? If I can build upon a pre-built sampler, I will. So I started by looking at Option 3. The BeanShell Sampler seemed pretty hacky, especially since the Kafka library I wanted to use might not work with it at all. The JUnit Sampler seemed too limited; for example, it couldn’t accept variables from JMeter and I knew I wanted to pass the message for publication from the JMeter script. That meant starting with the Java Sampler.
Writing a Custom Config Element
Unfortunately, there’s a dearth of documentation for developing custom Config Elements**. However, it turns out that this is because most components in JMeter are developed in the same manner, following the TestElement or TestBean approaches mentioned above. You just have to know to look for TestBean.
(But if you knew that, you might’ve ended up at this tutorial instead. I only found it when I was halfway through writing this post.)
Create a Java package containing three files:
[Component].javais the main class which provides the Config Element’s logic.[Component]BeanInfo.javaspecifies the Config Element’s input properties. These are shown as a form in the JMeter GUI.[Component]Resources.propertiesdefines the string resources used in the GUI.
In our example, we generate synthetic messages in a format specified by a producer app called “tagserve”. Therefore, we called our component TagserveLoadGenerator in the naming scheme above. This class should extend the abstract ConfigTestElement class to make our component a Config Element in the test plan.
On each iteration, this Config Element needs to generate a new message and set it as a variable for use by our Sampler. By implementing the LoopIterationListener interface as well, we will be notified when an iteration is beginning. We can use this notification to update the variables available to the downstream components. Additionally, we can check whether this is the first call and conditionally perform our initial setup using the values from the Config Element’s input form in the GUI.
The TagserveLoadGenerator takes as its input a filename and variableName from the user. The Config Element reads the file and parses the configuration. Then, on each iteration, it uses the configuration to generate a new message. This message is exported to the JMeter test plan as the variableName given by the user. Samplers can then use this variable.
public class TagserveLoadGenerator extends ConfigTestElement implements TestBean, LoopIterationListener { private static final Logger log = LoggingManager.getLoggerForClass(); private static final Type SITE_CONFIGS_TYPE = new TypeToken<Map<String, SiteConfig>>(){}.getType(); private final JSONTagRequestMetricsMarshaller marshaller = new JSONTagRequestMetricsMarshaller(); private final Random random = new Random(); private Map<String, SiteConfig> configs = null; private Map<String, Double> siteWeights = null; private String filename; private String variableName; @Override public void iterationStart(LoopIterationEvent loopIterationEvent) { if (configs == null) { configs = readSiteConfigs(getFilename()); siteWeights = parseSiteWeights(configs); } JMeterVariables variables = JMeterContextService.getContext().getVariables(); variables.put(getVariableName(), nextMessage()); } // public synchronized String getVariableName() { return variableName; } public synchronized void setVariableName(String variableName) { this.variableName = variableName; } public synchronized String getFilename() { return filename; } public synchronized void setFilename(String filename) { this.filename = filename; } |
For each parameter of your Config Element, you must define corresponding getter and setter methods. The property names must also match those specified in the BeanInfo class for your component. These names are case-sensitive.
public class TagserveLoadGeneratorBeanInfo extends BeanInfoSupport { private static final String FILENAME = "filename"; private static final String VARIABLE_NAME = "variableName"; public TagserveLoadGeneratorBeanInfo() { super(TagserveLoadGenerator.class); createPropertyGroup("tagserve_load_generator", new String[] { FILENAME, VARIABLE_NAME }); PropertyDescriptor p = property(FILENAME); p.setValue(NOT_UNDEFINED, Boolean.TRUE); p.setValue(DEFAULT, ""); p.setValue(NOT_EXPRESSION, Boolean.TRUE); p = property(VARIABLE_NAME); p.setValue(NOT_UNDEFINED, Boolean.TRUE); p.setValue(DEFAULT, ""); p.setValue(NOT_EXPRESSION, Boolean.TRUE); } } |
Lastly, the strings you define in the BeanInfo class must have corresponding string resources in the Resources.properties file.
displayName=Tagserve Load Generator Config tagserve_load_generator.displayName=Configure the Load Generator filename.displayName=Filename filename.shortDescription=Name of the file that holds the Load Generator config (relative or absolute filename) variableName.displayName=Variable Name variableName.shortDescription=Name of the variable exporting the Tagserve request JSON. |
As you can see, the integration with JMeter is fairly straight-forward. The bulk of the code in our Load Generator Config Element was generation logic as opposed to integration boilerplate. We’ll cover how to build and deploy this plugin after the next section.
Writing a Custom Java Sampler
Luckily, there are a few more resources for writing custom Java Samplers than any other JMeter extension. A list of resources I used is provided at the end.
To implement a Java Sampler, you must extend AbstractJavaSamplerClient. One instance of this class is generally created per thread; you can follow an example like RandomVariableConfig to override this behavior. YMMV. Here be dragons.
Only one method is required: runTest. You can optionally implement setupTest, teardownTest, and getDefaultParameters methods.
The setupTest and teardownTest methods are probably familiar to you from JUnit and they work similarly; you use them to create/store and remove/cleanup any dependencies you need during the test. The getDefaultParameters method is important as it specifies the complete and final set of parameters available to the Sampler. (Although the UI has an “Add” button, it doesn’t actually add a parameter to the class; it must be defined in this method.) Barrie Treloar suggests setting the value to ${MY_PARAMETER_NAME} for required parameters; I agree.
For example, the Kafka Producer Sampler accepts the following arguments.
@Override public Arguments getDefaultParameters() { Arguments defaultParameters = new Arguments(); defaultParameters.addArgument(PARAMETER_KAFKA_BROKERS, "${PARAMETER_KAFKA_BROKERS}"); defaultParameters.addArgument(PARAMETER_KAFKA_TOPIC, "${PARAMETER_KAFKA_TOPIC}"); defaultParameters.addArgument(PARAMETER_KAFKA_KEY, "${PARAMETER_KAFKA_KEY}"); defaultParameters.addArgument(PARAMETER_KAFKA_MESSAGE, "${PARAMETER_KAFKA_MESSAGE}"); defaultParameters.addArgument(PARAMETER_KAFKA_MESSAGE_SERIALIZER, "kafka.serializer.DefaultEncoder"); defaultParameters.addArgument(PARAMETER_KAFKA_KEY_SERIALIZER, "kafka.serializer.NullEncoder"); return defaultParameters; } |
The runTest main method uses the parameter variables from the JMeter configuration script. It must return a SampleResult instance; this object captures data such as whether the test was successful, the response code and message, any request or response data, and the test start/end times (used for calculating latency).
Continuing the Kafka producer example:
@Override public SampleResult runTest(JavaSamplerContext context) { SampleResult result = newSampleResult(); String topic = context.getParameter(PARAMETER_KAFKA_TOPIC); Long key = context.getLongParameter(PARAMETER_KAFKA_KEY); String message = context.getParameter(PARAMETER_KAFKA_MESSAGE); sampleResultStart(result, message); try { producer.send(new KeyedMessage<Long, byte[]>(topic, key, message.getBytes())); sampleResultSuccess(result, null); } catch (Exception e) { sampleResultFailed(result, "500", e); } return result; } |
The sample* methods are helpers again borrowed from Barrie. Most importantly is that we capture the stack trace when an exception is thrown and add it as the response details. This will make your life much easier when debugging your plugin. You can checkout the code.
Now let’s see how this is actually used.
Building and Installing the Plugin
Building and installing a JMeter plugin is fairly straightforward.
- Build your plugin as a Jar file.
- Install the plugin Jar into
$JMETER_HOME/ext/lib
Of course, the devil is in the details here.
You need to build your plugin against ApacheJMeter_core and ApacheJMeter_java. Since I like using Maven to manage my dependencies and build my projects, I just added these to the project pom file. Any third-party dependencies your plugin uses also needs to be bundled with it as well (aka, build a “fat jar”). If conflicts exist with any dependencies used by JMeter itself (e.g., different versions of a library), then you’ll need to relocate those dependencies under your namespace. Fortunately, this is all pretty standard and easy in Maven. In particular, the Maven Shade Plugin makes building uber jars and relocating dependencies a breeze.
Unfortunately, the JMeter pom (for version 2.11 anyway) transitively includes a dependency which is not yet available in Maven Central and causes the build to fail. You have to exclude this transitive dependency from both JMeter dependencies. There were some similar issues with transitive dependencies from Kafka.
One final gotcha: Maven doesn’t automatically include resources (such as the properties file) that aren’t in the default Maven resources directory. You have to configure Maven to include them otherwise your [Component]Resources.properties file won’t be included and the GUI won’t look right.
Checkout the kafkameter pom file if you want the details.
Usage
Once you’ve installed the plugin and (re)started JMeter, you’ll see the new Config Element right where you’d expect it.
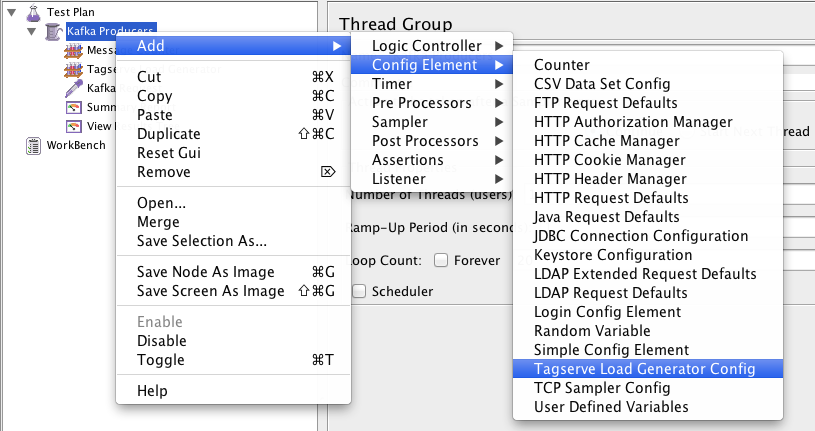
Then just complete the configuration form.

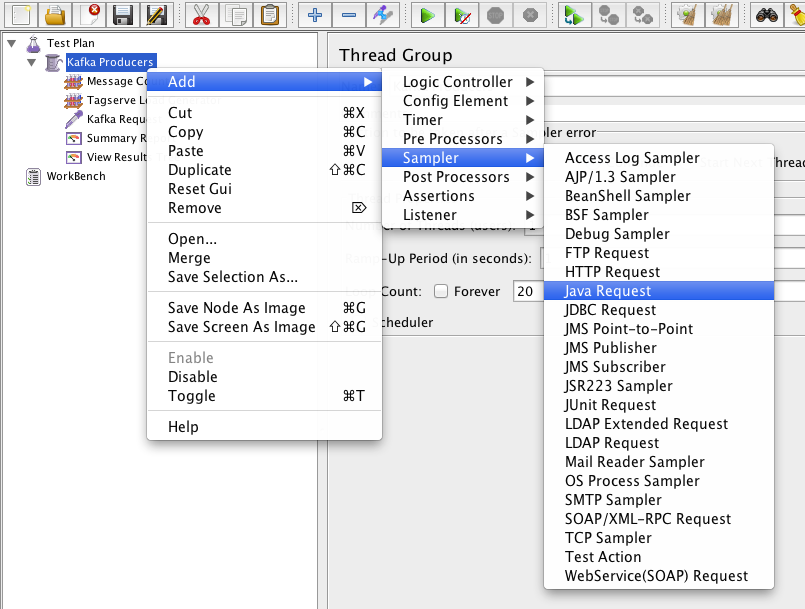
You remember that we built our custom sampler on top of the Java Sampler, right? Because of this, you won’t see our custom sampler name under Add > Samplers. Instead, you add the Java Request Sampler…
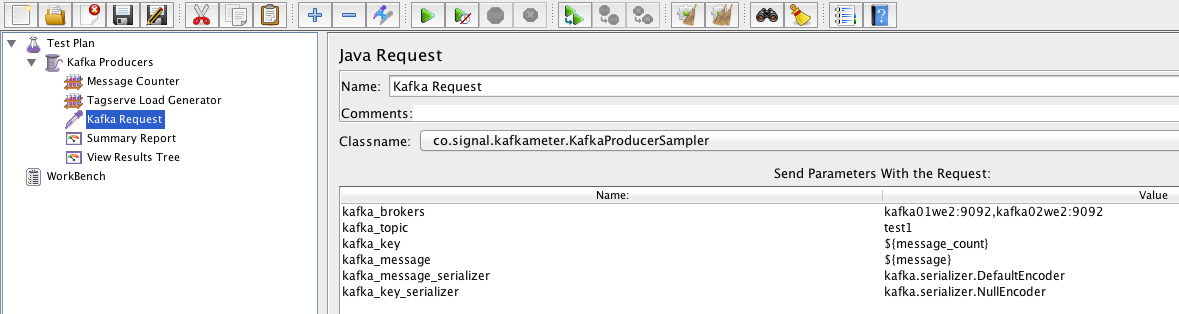
… and then select our custom sampler as the Classname. The Kafka Producer Sampler is pictured below with all of its configuration parameters. Note that we assigned “message” as the “variable name” in the Load Generation Config Element. We reference this from the Kafka Sampler as ${message}. Likewise, we created a Counter config element and named its variable ${message_counter}, referenced here as the kafka_key for partitioning.
Now you can add whatever listeners you want. Hint: “View Results Tree” will show the stack trace if any error occurred in the plugin.
Resources
Custom Java Sampler Resources:
- Load Test Whatever You Want With JMeter
- JUnit, BeanShell and another Java Sampler example
- Custom Sampler Message Thread
** Upon further review, there is a section in the How to Write a Plugin for JMeter (PDF) entitled “Making a TestBean Plugin for JMeter”. This is exactly what you need to write a simple Config Element. Unfortunately, without knowing that I wanted a TestBean Plugin initially, I skimmed right past this heading. Ironically, I mostly followed the CSV Data Set in the JMeter source as an example; this PDF does the same. Less ironically perhaps, the text is identical to the TestBean Tutorial.

If someone would need a custom sampler, I made, for sending Soap message with attachments here is a link to it:
https://www.dropbox.com/s/328xru5zpy262yh/CustomSoapSampler-1.0.jar?dl=0
Also have a look at our blog:
http://driven-by-tests.blogspot.be/
Hello,
i am writing plugin for jmeter and i ma facing issue that vlaues from ui are not used in ConfigTestElement:
i have defined Infobeen:
public class PricefxConfigBeanInfo extends BeanInfoSupport {
private static final Logger log = LoggingManager.getLoggerForClass();
public PricefxConfigBeanInfo() {
super(PricefxConfig.class);
createPropertyGroup(“Pricefx”, new String[]{
PricefxConfig.URL,
PricefxConfig.USERNAME,
PricefxConfig.PASSWD,
PricefxConfig.PARTITION,
PricefxConfig.DEBUG
});
PropertyDescriptor p = property(PricefxConfig.URL);
p.setValue(NOT_UNDEFINED, Boolean.TRUE);
p.setValue(DEFAULT, PricefxConfig.DEFAUL_URl);
p.setValue(NOT_EXPRESSION, Boolean.TRUE);
p.setValue(NOT_OTHER, Boolean.FALSE);
p=property(PricefxConfig.USERNAME);
p.setValue(NOT_UNDEFINED, Boolean.TRUE);
p.setValue(DEFAULT, “admin”);
p.setValue(NOT_EXPRESSION, Boolean.TRUE);
p.setValue(NOT_OTHER, Boolean.FALSE);
p=property(PricefxConfig.PASSWD);
p.setValue(NOT_UNDEFINED, Boolean.TRUE);
p.setValue(DEFAULT, “admin”);
p.setValue(NOT_EXPRESSION, Boolean.TRUE);
p.setValue(NOT_OTHER, Boolean.FALSE);
p=property(PricefxConfig.PARTITION);
p.setValue(NOT_UNDEFINED, Boolean.TRUE);
p.setValue(DEFAULT, “opisa”);
p.setValue(NOT_EXPRESSION, Boolean.TRUE);
p.setValue(NOT_OTHER, Boolean.FALSE);
p=property(PricefxConfig.DEBUG);
p.setValue(NOT_UNDEFINED, Boolean.TRUE);
p.setValue(DEFAULT, Boolean.FALSE);
p.setValue(NOT_EXPRESSION, Boolean.TRUE);
p.setValue(NOT_OTHER, Boolean.FALSE);
}
}
and also ConfigTestElement :
/**
* Constants for naming consitency.
*/
public static final String DEFAUL_URl = “https://qa.pricefx.eu/pricefx”;
public static final String URL = “pfxurl”;
public static final String PARTITION =”pfxpartition”;
public static final String USERNAME =”pfxusername”;
public static final String PASSWD =”pfxpasswd”;
public static final String DEBUG =”pfxdebug”;
public String pfxurl;
public String pfxpartition;
public String pfxusername ;
public String pfxpasswd ;
public boolean pfxdebug ;
@Override
public void threadStarted() {
JMeterVariables variables = JMeterContextService.getContext().getVariables();
variables.put(URL, pfxurl);
variables.put(PARTITION, pfxpartition);
variables.put(USERNAME, pfxusername);
variables.put(PASSWD, pfxpasswd);
variables.put(DEBUG, Boolean.toString(pfxdebug));
System.out.println(“pfx config: “);
for (Map.Entry entry : variables.entrySet()) {
System.out.println(entry.getKey() + ” : ” + entry.getValue());
}
}
public void threadFinished() {
}
public String getPfxurl() {
return pfxurl;
}
public void setPfxurl(String pfxurl) {
this.pfxurl = pfxurl;
}
public String getPfxpartition() {
return pfxpartition;
}
public void setPfxpartition(String pfxpartition) {
this.pfxpartition = pfxpartition;
}
public String getPfxusername() {
return pfxusername;
}
public void setPfxusername(String pfxusername) {
this.pfxusername = pfxusername;
}
public String getPfxpasswd() {
return pfxpasswd;
}
public void setPfxpasswd(String pfxpasswd) {
this.pfxpasswd = pfxpasswd;
}
public boolean isPfxdebug() {
return pfxdebug;
}
public void setPfxdebug(boolean pfxdebug) {
this.pfxdebug = pfxdebug;
}
}
but vlaues that i endter on ui are nto get poopulated here. if i set tham directly in threadStarted method they are accesibel in my samleler.
I have two hunches –
1) The bean names may not be interpreted the way you think due to different capitalization. Notice in my example that `VARIABLE_NAME = “variableName”;` in the PropertyDescriptor and then in the bean it was getVariableName and setVariableName. You don’t show your PricefxConfig but I’d look there.
2) Or it might do with the fact that your methods aren’t synchronized somehow. Try synchronizing them (public synchronized String getPfxpasswd). But I suspect its #1.